容器防护(通过安全容器部署)
该 容器防护 功能通过扩展和增强主机操作系统的安全层,为Linux容器工作负载及其主机提供保护。它利用服务器工作负载端点检测与响应、高级反漏洞利用、Linux专用反漏洞利用技术以及反恶意软件扫描服务和威胁防护功能。您可选择启用或禁用各安全模块。
重要提示
本功能可通过两个组件部署:
-
一个 最佳 代理包含 容器防护 模块,需安装在已部署Docker的Linux主机上。
-
一个 安全容器 部署在Linux主机端点下。 安全容器 是专用Docker容器,运行Ubuntu 20.04基础镜像及Linux版 最佳 官方Debian软件包。它以特权容器形式运行在容器主机上。
本指南提供通过安全容器部署该功能的操作说明。
提示
本指南中将安全容器简称为BSC(Bitdefender安全容器)。
当前安全容器支持的功能集有限:
-
反恶意软件
-
EDR传感器
-
高级反漏洞利用
-
容器防护
部署于Linux主机时,安全容器可保护主机及主机上运行的其他容器。
组件
容器防护 使用以下组件:
-
GravityZone 控制中心
-
一个安全容器。
-
未安装安全代理的Linux主机。
安装配置 容器防护
本指南将演示在Kubernetes集群上部署安全容器的方法。
在终端上安装此功能有三种可能方案:
-
登录 GravityZone 控制中心 .
-
从左侧菜单进入 网络 > 安装包 。
-
选择要用于安装过程的安装包。

该安装包必须已启用 容器保护 模块。
提示
有关如何编辑或创建新软件包的信息,请参阅 创建安装包 .
-
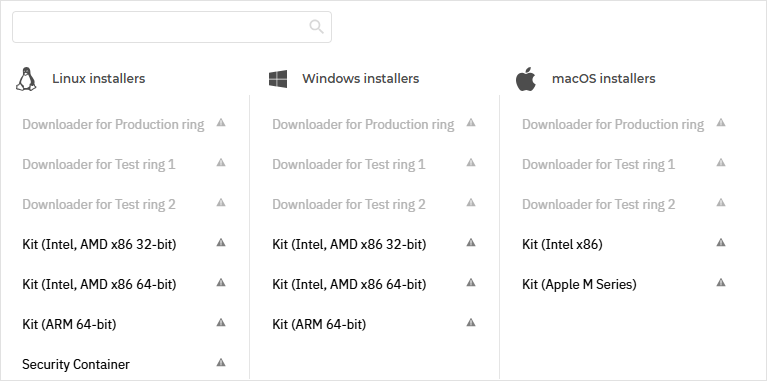
点击 下载 并选择 安全容器 :
这将打开 下载 安全容器 界面。该界面提供了在所有受支持的Kubernetes环境中安装 安全容器 的脚本。

重要提示
目前,Openshift环境仅与Azure Kubernetes服务(AKS)和VMware兼容。
-
选择
 复制
按钮(位于您要安装
安全容器
.
复制
按钮(位于您要安装
安全容器
.
-
进入您的环境并运行脚本:
curl -s https://download.bitdefender.com/business/k8s/bitdefender-security-container | bash -s -- --server cloudirl-ecs.gravityzone.bitdefender.com:443 --company <COMPANY_ID>
configmap/bitdefender-security-container-config configured
daemonset.apps/bitdefender-security-container created
注意
这将在您指定的集群中的每个主机上部署一个 安全容器 实例。
资源将在名为
bitdefender-security-container. -
检查所有Pod是否正在运行:
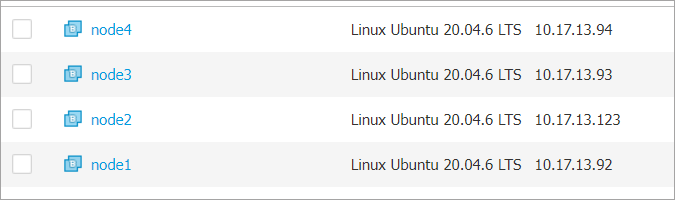
root@tcor-temp-workspace:~# kubectl get pods -n bitdefender-security-container -o wide
名称                                   就绪   状态     重启次数   年龄    IP             节点    提名节点       就绪门限
bitdefender-security-container-6kzg7   1/1    运行中   0          109秒  10.17.13.92    node1   <无>          <无>
bitdefender-security-container-9m6bg   1/1    运行中   0          109秒  10.17.13.94    node4   <无>          <无>
bitdefender-security-container-fv7qc   1/1    运行中   0          109秒  10.17.13.123   node2   <无>          <无>
bitdefender-security-container-txnd6   1/1    运行中   0          109秒  10.17.13.93    node3   <无>          <无>
这些Pod是通过 DaemonSet 对象部署的。这确保每个集群节点上始终运行一个Pod。如果发生错误导致Pod退出,DaemonSet会自动创建新的Pod。
root@tcor-temp-workspace:~# kubectl get daemonsets -n bitdefender-security-container
名称                             期望数   当前数   就绪数   最新数   可用数   节点选择器   年龄
bitdefender-security-container   4        4        4       4        4        <无>        5分24秒
-
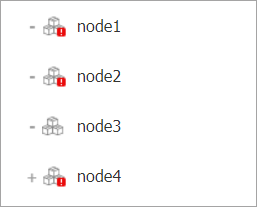
进入 GravityZone 控制台,从左侧菜单导航至 网络 页面,确认集群节点显示为容器主机。
-
仍在 网络 页面时,前往 容器 > 自定义容器组 ,确认每个集群节点都有一个对应的容器组显示。
-
点击每个容器组展开,确保所有容器(包括带有独特图标的安全容器)都显示在Gravity Zone中。

注意
节点上可能已有其他Kubernetes基础设施容器在运行。
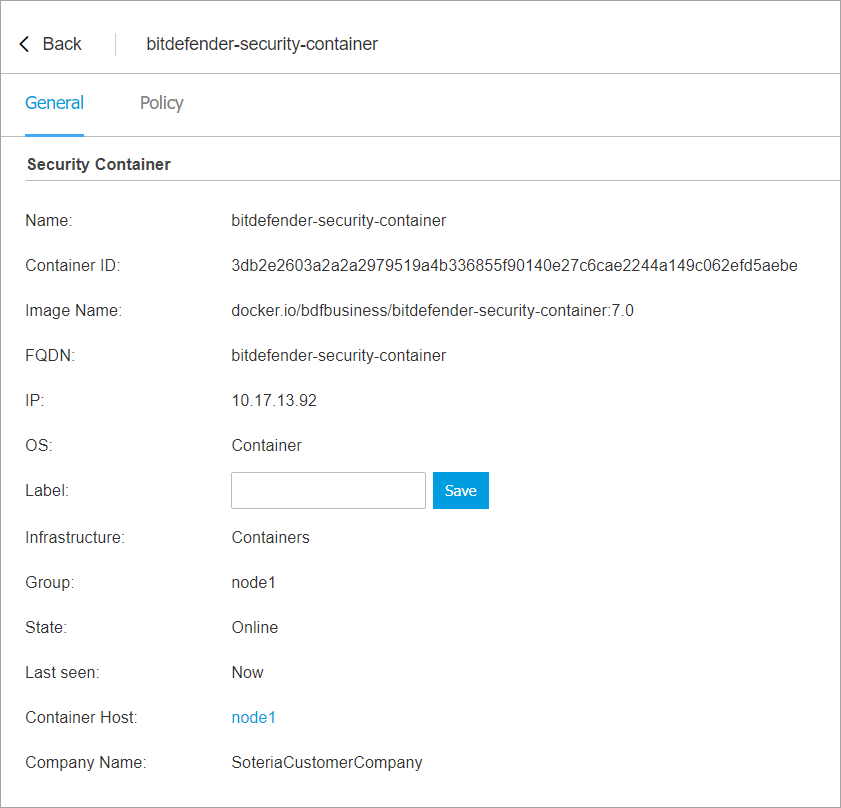
可点击安全容器查看详细信息。
-
通过以下任一方式验证部署:
-
在Kubernetes环境中,使用
kubectlgetpods-nbitdefender-security-container命令。 -
在 GravityZone 控制台中,前往 网络 页面(从左侧菜单进入)。
-
测试新功能
测试部署
要确认特定节点上的部署是否成功,请按以下步骤操作:
为与该节点上部署的安全容器交互,需在Pod内容器中开启shell。开启后即可像操作常规机器上安装的产品一样,访问所有产品文件(二进制、日志等)。
注意
容器日志不包含产品日志,需从容器内部访问。
-
在运行的Pod中开启shell并验证产品是否存在:
root@tcor-temp-workspace:~# kubectl exec -it bitdefender-security-container-6kzg7 -n bitdefender-security-container -- bash
root@node1:~# /opt/bitdefender-security-tools/bin/bdsecd -V
Bitdefender安全工具版本7.0.5.200049 (d0fd7aa8)
-
检查BEST进程是否正在运行。
root@node1:~# ps afx | grep bitdef
  27820 ?        S      0:00  |       \_ /bin/sh -c cd /; "/opt/bitdefender-security-tools/bin/bdwatchdogd" -c "/opt/bitdefender-security-tools/etc/bdwatchdogd.json"
  27821 ?        S      0:00  |           \_ /opt/bitdefender-security-tools/bin/bdwatchdogd -c /opt/bitdefender-security-tools/etc/bdwatchdogd.json
  27822 ?        Sl     0:43  |               \_ /opt/bitdefender-security-tools/bin/bdsecd -c /opt/bitdefender-security-tools/etc/bdsecd.json
  27920 ?        Sl     0:33  |               |   \_ /opt/bitdefender-security-tools/bin/bdsecd -c /opt/bitdefender-security-tools/etc/bdsecd.json -m fanotify -M
  27932 ?        S      0:00  |               |   |   \_ /opt/bitdefender-security-tools/bin/bdsecd -c /opt/bitdefender-security-tools/etc/bdsecd.json -m fanotify -M
  27936 ?        S      0:00  |               |   |   |   \_ /opt/bitdefender-security-tools/bin/bdsecd -c /opt/bitdefender-security-tools/etc/bdsecd.json -m fanotify -M
  33967 ?        S      0:00  |               |   |   \_ /opt/bitdefender-security-tools/bin/bdsecd -c /opt/bitdefender-security-tools/etc/bdsecd.json -m fanotify -M
  33968 ?        S      0:00  |               |   |   |   \_ /opt/bitdefender-security-tools/bin/bdsecd -c /opt/bitdefender-security-tools/etc/bdsecd.json -m fanotify -M
  33977 ?        S      0:00  |               |   |   \_ /opt/bitdefender-security-tools/bin/bdsecd -c /opt/bitdefender-security-tools/etc/bdsecd.json -m fanotify -M
  33978 ?        S      0:00  |               |   |   |   \_ /opt/bitdefender-security-tools/bin/bdsecd -c /opt/bitdefender-security-tools/etc/bdsecd.json -m fanotify -M
  33995 ?        S      0:00  |               |   |   \_ /opt/bitdefender-security-tools/bin/bdsecd -c /opt/bitdefender-security-tools/etc/bdsecd.json -m fanotify -M
  33996 ?        S      0:00  |               |   |   |   \_ /opt/bitdefender-security-tools/bin/bdsecd -c /opt/bitdefender-security-tools/etc/bdsecd.json -m fanotify -M
  34005 ?        S      0:00  |               |   |   \_ /opt/bitdefender-security-tools/bin/bdsecd -c /opt/bitdefender-security-tools/etc/bdsecd.json -m fanotify -M
  34006 ?        S      0:00  |               |   |   |   \_ /opt/bitdefender-security-tools/bin/bdsecd -c /opt/bitdefender-security-tools/etc/bdsecd.json -m fanotify -M
  34015 ?        S      0:00  |               |   |   \_ /opt/bitdefender-security-tools/bin/bdsecd -c /opt/bitdefender-security-tools/etc/bdsecd.json -m fanotify -M
  34016 ?        S      0:00  |               |   |   |   \_ /opt/bitdefender-security-tools/bin/bdsecd -c /opt/bitdefender-security-tools/etc/bdsecd.json -m fanotify -M
  34025 ?        S      0:00  |               |   |   \_ /opt/bitdefender-security-tools/bin/bdsecd -c /opt/bitdefender-security-tools/etc/bdsecd.json -m fanotify -M
  34066 ?        S      0:00  |               |   |       \_ /opt/bitdefender-security-tools/bin/bdsecd -c /opt/bitdefender-security-tools/etc/bdsecd.json -m fanotify -M
  28649 ?        Sl     0:11  |               |   \_ /opt/bitdefender-security-tools/bin/bdsecd -c /opt/bitdefender-security-tools/etc/bdsecd.json -m antimalware -M config=/opt/bitdefender-security-tools/var/lib/modules/antimalware/update.jso.temp
  29354 ?        Sl     1:31  |               |   \_ /opt/bitdefender-security-tools/bin/bdsecd -c /opt/bitdefender-security-tools/etc/bdsecd.json -m ctc -M config=/opt/bitdefender-security-tools/var/lib/modules/ctc/update.jso.temp
  27823 ?        Sl     0:04  |               \_ /opt/bitdefender-security-tools/bin/updated -c /opt/bitdefender-security-tools/etc/bdsecd.json
  27824 ?        Sl     0:04  |               \_ /opt/bitdefender-security-tools/bin/epagngd -c /opt/bitdefender-security-tools/etc/bdsecd.json
注意
由于节点上已运行多个容器,因此存在多个fanotify进程。
-
前往 网络 页面(通过 GravityZone 控制中心 .
-
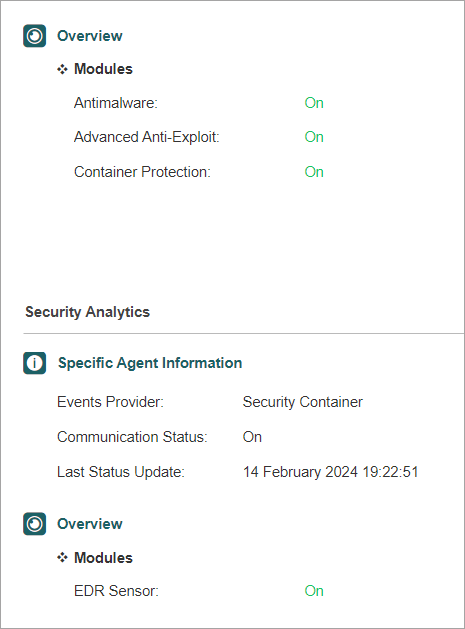
进入 防护 选项卡并检查以下信息:
-
在 代理 部分确保 主扫描引擎 为
中央扫描且 备用扫描引擎 为混合扫描.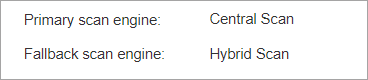
-
在 概览 部分确保 反恶意软件 , 高级反漏洞利用 , 容器保护 以及 EDR传感器 功能已启用。
-
若所有检查均通过,则确认部署成功。您可对集群中所有节点重复上述步骤。
测试实时防护功能
要为基础安全控制器(BSC)上的反恶意软件实时扫描运行基础测试,并验证防护是否覆盖容器主机及所有受管运行中容器,请按以下步骤操作。
由于环境为Kubernetes集群,需通过DaemonSet定义以与BSC部署相同方式(每个集群节点一个Pod)创建其他Pod。以下定义描述了一个持续运行50000秒的CentOS 7容器DaemonSet。
apiVersion: apps/v1
kind: DaemonSet
metadata:
  name: centos-temp
  namespace: default
  labels:
    name: centos-temp
spec:
  selector:
    matchLabels:
      name: centos-temp
  template:
    metadata:
      name: centos-temp
      labels:
        name: centos-temp
    spec:
      tolerations:
      - key: node-role.kubernetes.io/master
        operator: Exists
        effect: NoSchedule
      - key: node-role.kubernetes.io/control-plane
        operator: Exists
        effect: NoSchedule
      containers:
      - name: centos-temp
        image: centos:7
        command: ["sleep", "50000"]
-
将此定义保存至名为
centos.yaml的文件中,存放于集群外部。 -
运行以下命令(该命令会轻微修改文件以创建多个DaemonSet):
for i in {1..5}; do sed "s/centos-temp/centos-temp$i/g" centos.yaml > /tmp/centos-tmp.yaml && kubectl apply -f /tmp/centos-tmp.yaml; done daemonset.apps/centos-temp1 created daemonset.apps/centos-temp2 created daemonset.apps/centos-temp3 created daemonset.apps/centos-temp4 created daemonset.apps/centos-temp5 created -
等待所有对象创建完毕且Pod全部进入运行状态。
root@tcor-temp-workspace:~# kubectl get pods -o wide
名称                 就绪   状态     重启次数   年龄   IP               节点    提名节点        就绪门限
centos-temp1-4krnb   1/1    运行中    0          51秒  10.233.71.61     node3   <无>           <无>
centos-temp1-6fq8v   1/1    运行中    0          51秒  10.233.75.61     node2   <无>           <无>
centos-temp1-7fhqp   1/1    运行中    0          51秒  10.233.102.135   node1   <无>           <无>
centos-temp1-s2985   1/1    运行中    0          51秒  10.233.74.65     node4   <无>           <无>
centos-temp2-kv7sz   1/1    运行中    0          51秒  10.233.71.28     node3   <无>           <无>
centos-temp2-m48hx   1/1    运行中    0          51秒  10.233.75.4      node2   <无>           <无>
centos-temp2-n2z9c   1/1    运行中    0          51秒  10.233.74.127    node4   <无>           <无>
centos-temp2-pwc69   1/1    运行中    0          51秒  10.233.102.133   node1   <无>           <无>
centos-temp3-b8vdm   1/1    运行中    0          50秒  10.233.75.26     node2   <无>           <无>
centos-temp3-cxjrz   1/1    运行中    0          50秒  10.233.74.66     node4   <无>           <无>
centos-temp3-p8qxs   1/1    运行中    0          50秒  10.233.71.26     node3   <无>           <无>
centos-temp3-ztqrb   1/1    运行中    0          50秒  10.233.102.157   node1   <无>           <无>
centos-temp4-4chdk   1/1    运行中    0          50秒  10.233.75.21     node2   <无>           <无>
centos-temp4-8fqtx   1/1    运行中    0          50秒  10.233.74.121    node4   <无>           <无>
centos-temp4-cqchs   1/1    运行中    0          50秒  10.233.71.21     node3   <无>           <无>
centos-temp4-lptjt   1/1    运行中    0          50秒  10.233.102.136   node1   <无>           <无>
centos-temp5-8xx8z   1/1    运行中    0          50秒  10.233.75.62     node2   <无>           <无>
centos-temp5-hbdtk   1/1    运行中    0          49秒  10.233.102.139   node1   <无>           <无>
centos-temp5-kfx7t   1/1    运行中    0          50秒  10.233.74.92     node4   <无>           <无>
centos-temp5-lzq44   1/1    运行中    0          50秒  10.233.71.60     node3   <无>           <无>
-
在单个集群节点上测试功能:
-
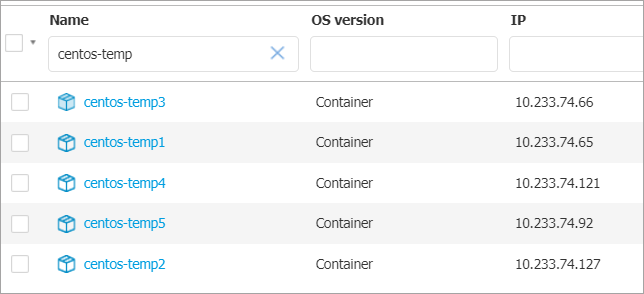
前往 网络 页面(通过 GravityZone 左侧菜单),确认该节点的容器组中新增了5个容器。
-
在受保护路径下创建恶意软件样本文件(如EICAR测试文件) (位于容器主机上) .
root@node3:~# echo 'X5O!P%@AP[4\PZX54(P^)7CC)7}$EICAR-STANDARD-ANTIVIRUS-TEST-FILE!$H+H*' > /home/test1.txt
反恶意软件实时防护功能将自动检测EICAR文件并将其移至隔离区。
-
在被保护的路径内创建恶意软件样本, 即在先前部署的某个容器内部 .
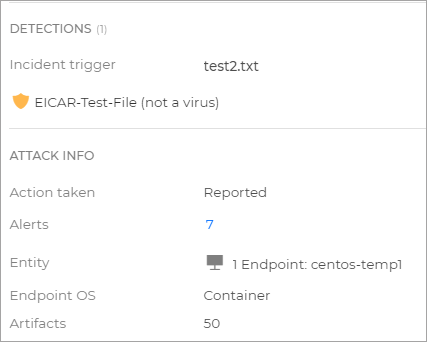
root@tcor-temp-workspace:~# kubectl exec -it centos-temp5-lzq44 -- bash
[root@centos-temp5-lzq44 /]# echo 'X5O!P%@AP[4\PZX54(P^)7CC)7}$EICAR-STANDARD-ANTIVIRUS-TEST-FILE!$H+H*' > /home/test2.txt
反恶意软件实时防护功能将自动检测EICAR文件并将其移至隔离区。
-
前往 事件 页面(通过 GravityZone 左侧菜单),确认存在2起源自反恶意软件功能的事件,一起针对
test1.txt,另一起针对test2.txt.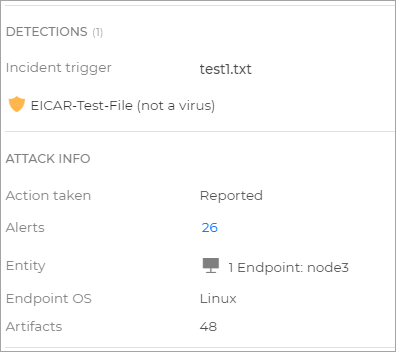
-
-
您现在可以删除为此测试创建的容器组。
产品更新
与BEST Linux v7的软件包版本不同,安全容器不支持产品更新。当新镜像版本发布时,需要 重新部署安全容器 .
安全内容更新
您可通过以下任一方式执行安全内容更新:
-
设置自动签名更新 (通过在容器主机上应用的Gravity Zone策略中启用该功能)。
-
通过Gravity Zone 手动执行更新 更新 任务(在容器主机上创建)。